
Long winter’s nap
It seems time to pack it in for the season. Our New England nighttime temperatures regularly dip into the forties, and daytimes only flirt with sixty — conditions inconducive to optimal epoxy curing and strength. Low temperatures and unheated workspaces also raise risks for problematic condensation.
At this time, one aft set of bottom panels is glued together. The remaining bottom panels are cut, scarfed, and ready to be glued.
Given the copious amounts of epoxy needed to glue up the the bottom panels and hull, the criticality of these joints, and working in unheated outdoor conditions, it seem wise to pause until warmer weather.
I will read the manual to identify epoxy-free work that can be done. Perhaps side panels can be scarfed and the transom shaped. Any stretch of unseasonable warmth will not be taken for granted.
A reimmersion into photography seems an apt distraction and challenge until, God willing, the blessed warmth of summer and the promise of progress on the Great Alaskan returns.

Silk scarfing and first glue up
The addition of a knob-stop and angling the bar clamp allows the guide rail to be repositioned without clamping. This small change increased efficiency. An important technical detail of this method of scarfing is having enough uncut edge surface on which to rest the rail. The final panel dimension is 40”, but these were left at 48” so that the 7 1/4” rail had enough room on the waste side of the panel. The only way of using this method if an entire board needed to be scarfed would be to add a temporary scrap piece, or strategically leave strips in select locations to support the rail. After these scarfs were completed, the boards were cut to width with the track saw.
The video depicts the major-domo of scarfing for this boat — a 6” scarf on 3/4” stock. While the 3” scarfs needed for 3/8” material can be quickly removed by the router, these doubly long and deeper scarfs require the removal of significantly more material, so slower passes are a must. A few rough passes with the Rotex sander set on grind mode with 80-grit paper smoothed out the joint face, but still left the cells rough and open to absorb epoxy.
This set of scarfs completes those needed for the bottom panels.
Now that the scarfing of the bottom panels is complete, the first set are joined. I started with the aft and middle 3/4” sections. As per the manual, a straight edge (a freshly cut piece of remaindered 3/4” plywood) was screwed to an underlying piece of 3/4. The straight edge helps ensure the glue-up is straight.
Plastic and packing tape beneath the scarf prevent epoxy from sticking to the straightedge and the board to which the pieces are clamped. The top clamping board is also covered in plastic and tape.
Several coats of straight epoxy were applied to each scarf face with a foam roller. After allowing the epoxy to soak in, another coat is added until it no additional epoxy would be absorbed by the end grain. Then, a thick slurry of epoxy and glass fibers was applied to one face of the scarf and the pieces were joined. A straightedge ensured flatness across the scarf.
Despite minimal squeeze out, I do not believe the joint is starved. The ‘clamping board’ used to apply even pressure over the joint received nails every 4”. I added more nails than specified because it seemed that the edges of the board were very slightly lifted… Can’t hurt.


Did I mention?
One of the space limitations I am working around is the need to store our 16’ Snow Goose in one of the garage bays. The boat is rolled out of the garage to make way for working, then rolled back at the end of the day. This necessitates some careful planning and placement of materials. Here. the boat trailer straddles the newly scarfed blank as they slowly cure. I’ll check the progress of the joint in a couple of days and then get the next set glued up. At some point. I will need to use the jig as a workbench for gluing the 3/8” sections to the 3/4” ones because the garage is not large enough to house the 28’-long final assemblies.


Nicer scarf
Given the numerous scarfs needed to build this boat, a machine-assisted method is beneficial. After some experimentation, the Festool router with track accessory and a handy clamp did the trick. This process is drastically less laborious and produces a consistent, though slightly rough result. A bit of block planing refines the scarfed surfaces.
Despite the relative ease of this scarfing method compared to electric and manual planing, it still requires some care and takes time. Router depth setup requires testing and refinement in some cases.
The bar clamps not only align the sheets, but act as a support for the aluminum track so that it doesn’t sag and inadvertently deepen the cut.
This method was first used to create 3” scarfs on seven full sheets of 3/8” plywood. The video depicts scarfing four shorter sheets of 3/8” ply used between bow and amidships sections of the bottom panels.

Scarfing
To say that manually scarfing plywood is anything but grueling is an egregious falsehood, and claims to the contrary should be treated with the utmost skepticism.
It is no wonder that people smarter than I have developed contrivances to make scarfing easier. Purchase or manufacture of circular saw jigs, router sleds, and electric plane accessories can eliminate the excruciatingly laborious process of hand planing scarf joints. Live and learn.
Four full sheets of 3/4” Maranti plywood were wrangled onto sawhorses and the edges staggered by six inches — the length of the scarf face. Clamping the edges of the stack brought them into alignment so that the joints turned out straight.
Guidelines drawn on the wood’s edges defined the bottom of the scarf. The electric plane used to begin removing material became heavy and unwieldy with time. No amount of repositioning or body mechanics made it easier to use. I switched to a freshly sharpened block plane.
Hours of hand planing, requiring four blade sharpenings, made the scarfs as flat and even as I can make them. Holding a flat edge against their faces reveals slight imperfections that the grace of thickened epoxy can readily remedy.
Unfortunately, eight sheets of 3/8” plywood still require scarfing. Perhaps a better use of the electric plane or a scarfing jig will make the next session less daunting. Perhaps not.

3/4” sheets are pulled into position using temporary clamping blocks and quick clamps. Maneuvering the 70-pound sheets into a uniformly spaced and even stack is tricky.

Guidelines on the edges of the 3/4” sheets defines the scarf.

The Ryobi electric plane connected to a vacuum makes the initial rough cuts. The need to repeatedly reach into the middle of a 2’ deep, 4’ wide area of the scarf became taxing and reduced the quality of the cuts.
Sharpening the low-angle block plane. This Lie Nielsen may be my most used boat-building tool.
Planing until each layer of plywood is relatively straight is a good guide.

Mold making
Four molds of 3/4” plywood attached to 2x4s are attached to the jig's top at specified stations. The molds hold the bottom panels at the correct angles as they are stitched and glued together.
Making the molds was straightforward. They were fashioned from the same sheet of plywood used to make the jig gussets. Using a fine-toothed track saw blade reduced tear-out. Half of each mold was measured, drawn, and cut to shape and then used as a template to make a matching half.
Now that the jig is ready and the molds are completed, it is time to begin scarfing the bottom panels — work on the boat itself is about to start.


A little stack of mold halves awaiting use

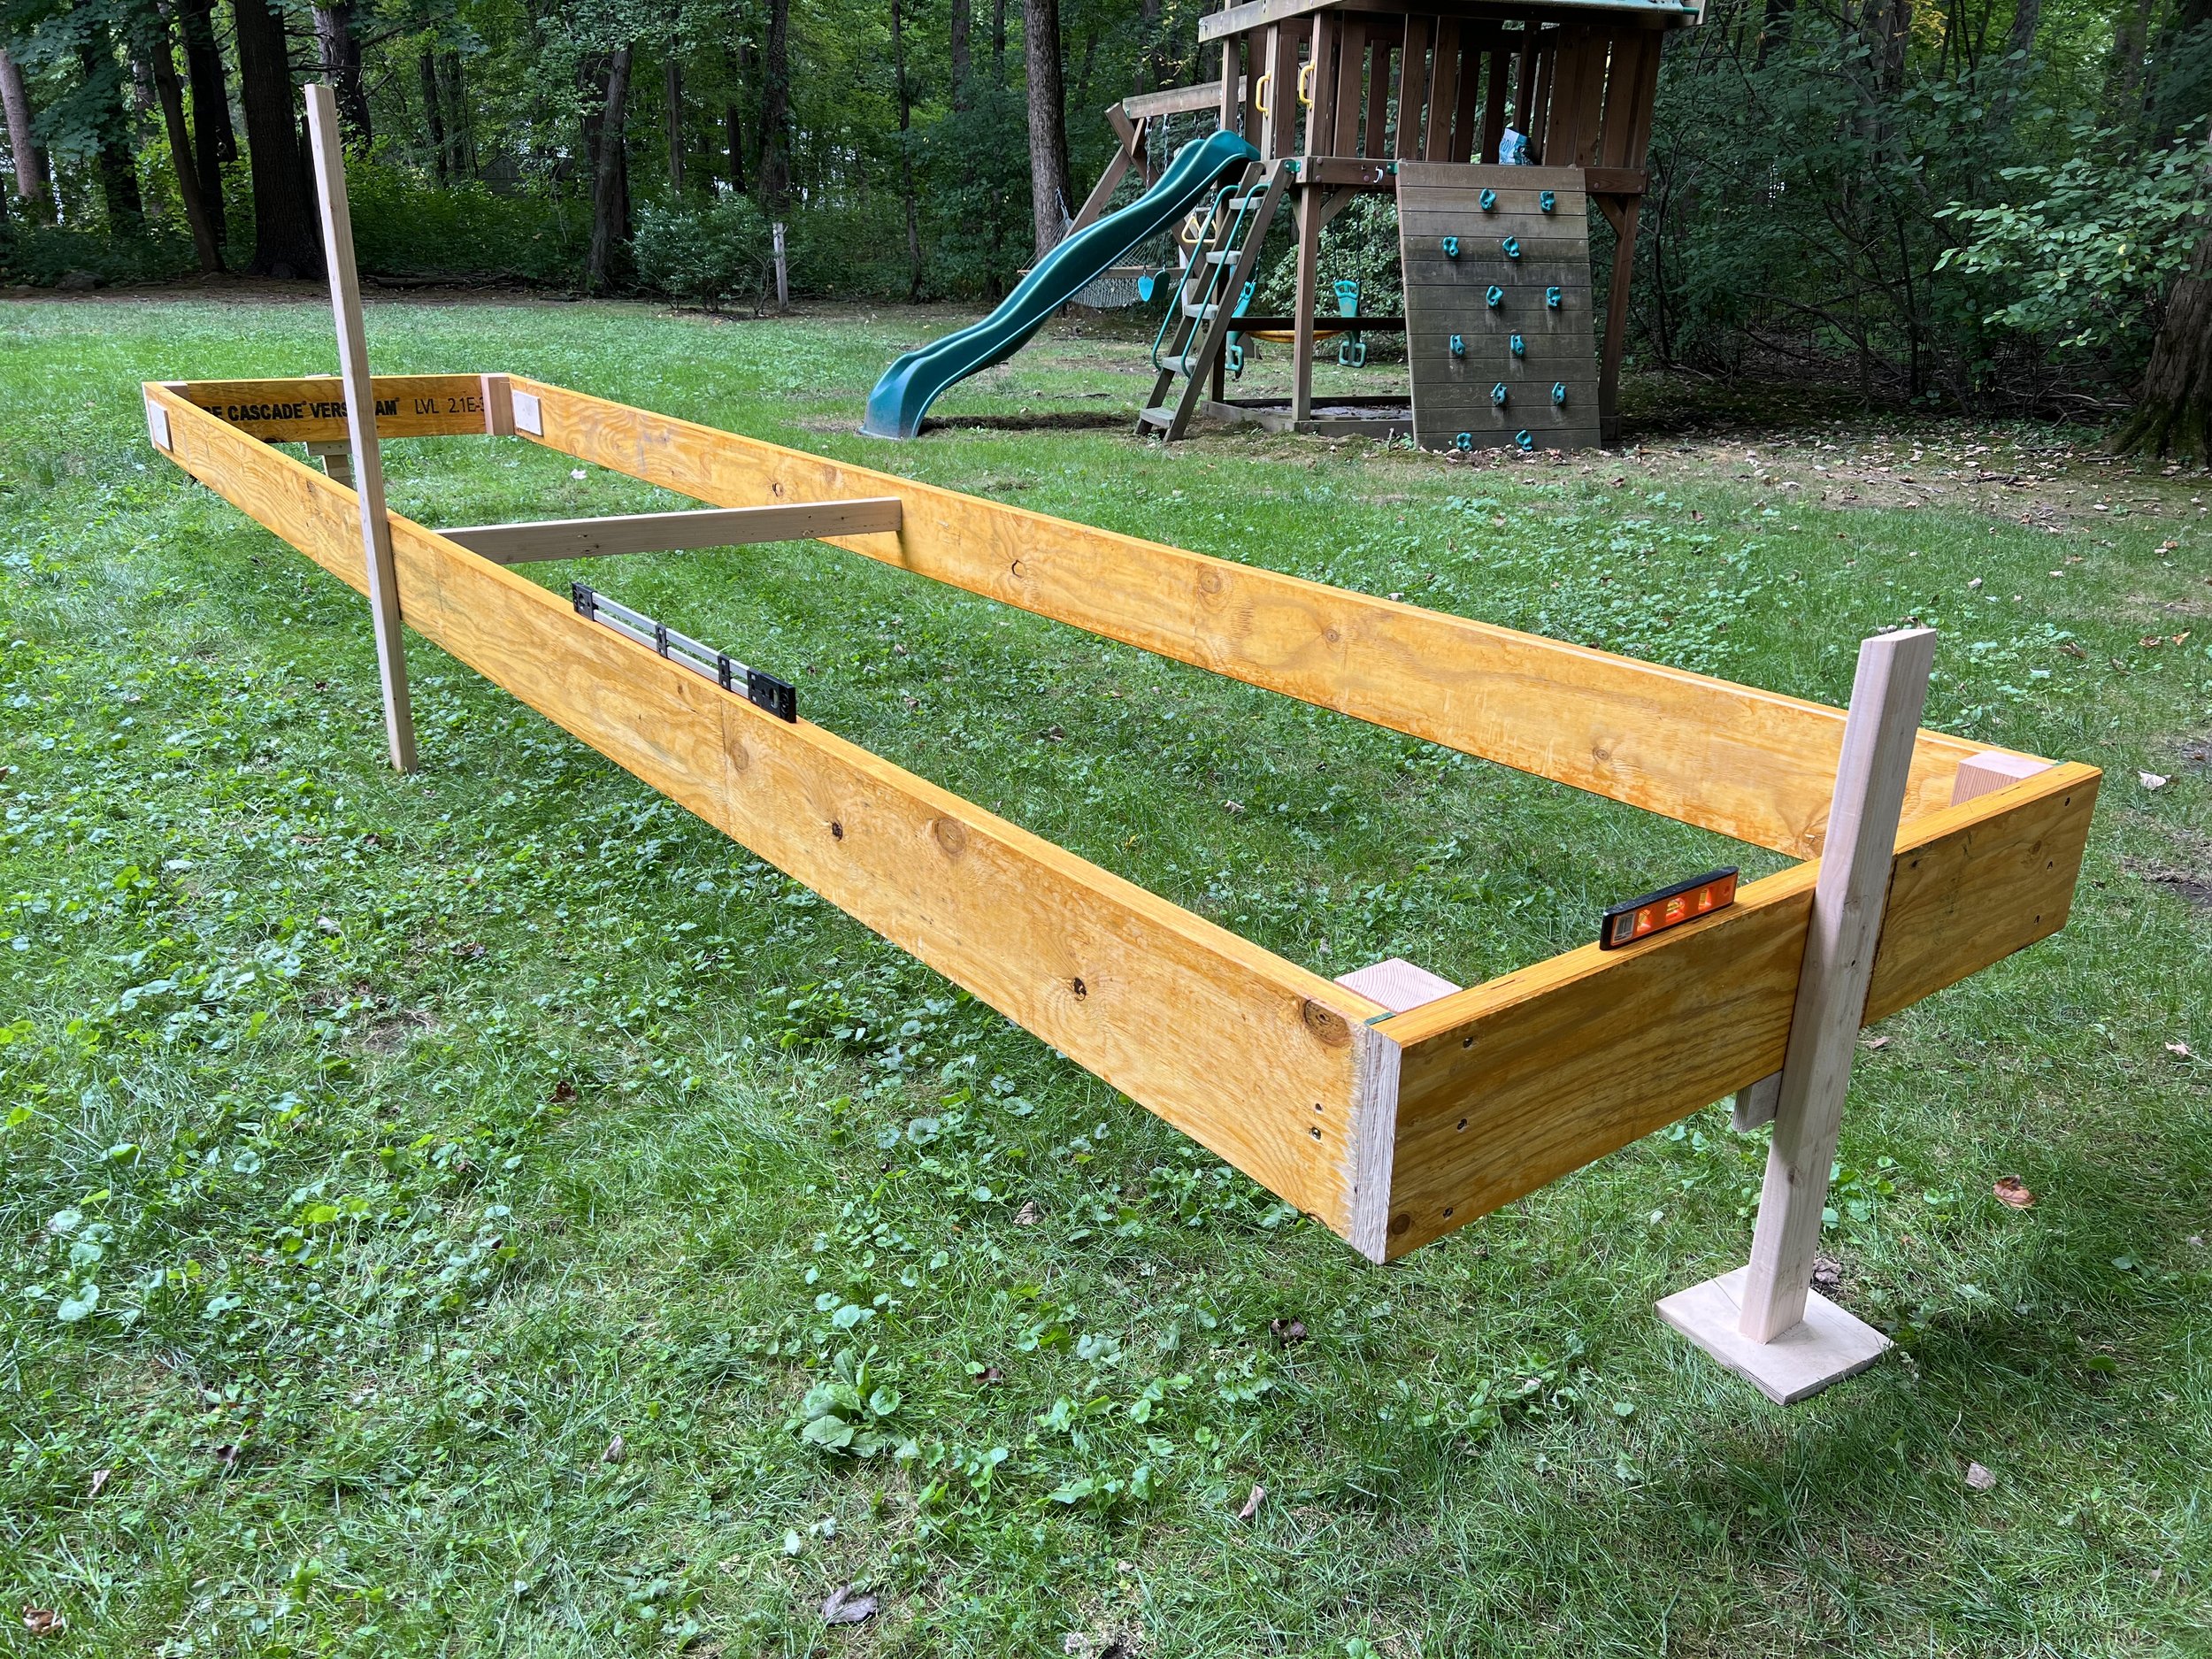
The jig is up
Pressure-treated 1x8 plates were cut to support each leg, and the permanent pressure-treated 2x4 legs were cut and attached using two 3/8” GRK RSS construction fasteners (which are equivalent to 1/2” lag screws). Thanks to the sage advice of a knowledgable friend, 2x4 sections are sistered to each leg between the lvl and ground plate. Adding the sistered pieces reduces the bearing weight on the screws holding the legs attached to inner face of the jig sides. Cross-bracing between legs resists racking.
Surprisingly, multiple corner-to-corner measurements revealed that the jig was off by just 3/16” before correcting for square. A come-along attached to temporary screws pulled the jig into square, and the specified 3/4” plywood corner gussets were fastened into place.
Building, reinforcing, leveling, and squaring the jig took longer than hoped. However, ensuring a sturdy and true strongback now could save headaches later.


Jig setup
Jig setup and the wrangling of long lvl members was as arduous as imagined.
After attaching the ends of the lvls to 4x4 corner pieces, the roughly assembled frame was lifted onto temporary end supports made of 2x4 and plywood shelves, allowing corners to be raised and lowered to achieve approximate level.
Reversed quick clamps were used as makeshift jacks to facilitate leveling until 2x4 legs were temporarily secured.
Pressure-treated lumber will be used to make permanent legs and ground plates. As the legs are installed, a laser level and tape measure will be used to make the jig as level as possible. Cross members fastened diagonally between the legs will resist racking.
The jig will be measured diagonally to determine square, and a come-along or other means of persuasion will be used to correct squareness. Plywood gussets attached to the top of the jig and diagonal cross-braces should maintain square.

The roughly assembled jig on temporary end stands. The lvl extensions are visible on the side of the jig facing left.

Stringer completion
The lines from the rough cut port stringer were transferred to the starboard lvl blank, and the tangent lines were cut with a track saw at progressive bevel angles. The stringers were clamped together with wide faces touching, and electric planing made their rough cut edges fair and symmetrical.
The use of a freshly sharpened Leigh Nielsen block plane, a favorite and well-used tool, achieved a smooth edge surface.
Clamping the stringers with narrow faces touching revealed that the starboard edge was proud of the port edge by approximately 1/16” in places. The inner edge of the port stringer was traced onto the starboard inner edge, and the block plane was used to fair to the line.
The stringers were returned to the sawhorses next to the garage and covered with a tarp until ready for use.
Next comes the jig setup.


Read thrice, order once
A 28’ boat calls for a 21’ jig. I ordered 20’ lvls. One foot of lvl scrap was added to the ends of each 20’ section using three 12mm Festool dominos and Titebond III. The joint is lapped on both sides with 1/4” plywood pieces and construction screws.


Port stringer
After a week laid up with covid, it is time to push on. The port stringer is roughly cut to shape.
Outfitted with a new 12-tooth blade, the Festool TS-55 cut the LVL like butter. A set of guide blocks cut from scrap plywood was used to set the blade angle at each station to achieve the specified graduated bevel.


The 24’ LVLs are too long to be stored in the garage. Each stringer is returned to sawhorses aside the garage and covered with a tarp after working.

Signs of the times and necessary pauses
At the onset of the COVID pandemic, a geneticist friend predicted that the entire population would eventually be infected. My turn came a few days ago after dodging pestilence for two years. Alas, I am fortunate to experience relatively mild symptoms. However, even mild COVID symptoms can make boat building uncomfortable and unsafe.
In a related twist, pandemic-related supply chain issues make materials sparse and expensive. While a marine-grade plywood dealer is relatively close by, their prices have more than doubled in the past two years and are unlikely to decline.
Fiberglass availability is also affected by the pandemic. The multiple widths and weights of fiberglass tape and cloth required — 4”, 9-ounce, 6”, 9-ounce, biaxial tapes, broadcloth, and more — are hard to find. Materials had to be sourced from various suppliers across the country. Even the most reputable and established marine material suppliers have little or no glass in stock, and each reports sporadic and unreliable restocking.
The next step is cutting the stringers. I am hoping a well-used Festool TS-55 track can make the series of progressively beveled cuts. The saw is a wonder for sheet goods but can struggle with hardwoods or deep cuts. To increase the chances for success, a 12-tooth rip-cut blade is on order. With luck, slowing the blade speed and taking time with each cut should get the job done.


The little things
Progress can be made when even small amounts of time present themselves. Angled guide blocks made from 1” plywood scrap were cut with a miter saw during a thirty-minute lunch break. These guide blocks are used to set a series of specified saw angles to achieve the progressive bevel of the stringer edges.


Timber
The stringers (longitudinal structural members below decks), transom, and building jig call for LVL (laminated veneer lumber) timbers. LVLs are manufactured wooden timbers primarily used as roof ridges and other structural members of houses. They are immensely strong. They are also heavy and unwieldy when manipulating them singlehanded.


It was not terribly hard to wrangle the LVLs onto sawhorses. A tarp was tied over the stack until ready for use.

First steps
It takes some stuff to build a boat, but not as much as some might think. I started buying materials a few weeks ago, including marine-grade plywood of different thicknesses, epoxy and fillers, and miscellaneous dimensional lumber. One of the first challenges of this build is the supply chain impacts of the pandemic. As of this writing, it is very difficult to find the various widths and weights of fiberglass tapes required. Fiberglass tape is vital to stitch-and-glue boat building, and until the tape is located, I am at a bit of a standstill. I found a knowledgeable fiberglass and epoxy supplier called Merton’s in Springfield, Massachusetts, who sent all of what they had in stock and promised to look out for the remainder. There’s nothing like working with people who know their products and sources. Other work can be done while awaiting materials. The jig must be built and made level and true. There are panels to loft and cut.
To date, I have completed the port and starboard shelves, which define the shear and hold the gunnels. The shelves are made by lofting lines and points onto 1/8” plywood, using battens to connect the dots with smooth lines, and cutting out and fairing the shape. The lines from the template are transferred onto 1 1/8” ‘blanks’ made by laminating sheets of 3/4” and 3/8” marine plywood. The blanks are approximately 16’ long and bonded with silica-thickened epoxy. Approximately 200 finish nails driven every six inches are used to clamp the lamination together until the epoxy cures. Removing 200 nails can make one appreciate body mechanics.
The outer edge of the shelves requires an angled cut that roughly matches the angle of the side panels to which they are mated. Despite a sturdy jigsaw, new blade, and plenty of patience, much fairing is needed to smooth the flats and bumps along the edges. The ability to hide imperfections with thickened epoxy is a benefit of the stitch-and-glue process but can tempt a lackadaisical eye for detail if unchecked.

A stout pair of sawhorses (or more) comes in handy. I made a short and rather slap-dash pair to keep lumber off the ground when stored outdoors. The pair pictured here stands at 37”, a height that allows me to comfortably cut lofted panels, scarf plywood, and more.
While rough around the edges, these horses were made with care. The lower member of the i-beam and legs are tapered at 12º to allow a narrower stance and tighter fit of components. Large gussets reduce stress and add strength. One-inch plywood blocks abutting leg edges reduce racking. Pre-drilled holes and large-diameter construction-strength fasteners make strong connections and reduce the risk of splitting. Leg edges and ends are eased with a hand plane to reduce splitting when dragged and the possibility of splinters. While these horses should easily hold over a ton of weight, the need to do so is unanticipated.
A lesson I keep learning is how to use tools on-hand and work around limitations. A Festool track saw I have owned for years was used to cut bevels onto the lower i-beam member, a step that required multiple passes. A table saw would make steps like this easier, but making due and reducing the costs of this already remarkably expensive process is a part of this journey.

An inexpensive Ryobi electric plane will accomplish various needs. The Ryobi was selected because it is preferred by Louis Sauzedde, a master shipwright whose Youtube channel is called Tips from a Shipwright. A fount of knowledge earned through lived experience, Louis offers an informative video about how to prepare this plane for use. After being tuned up using Louis’ suggestions, the little plane does a fine job removing material.
The electric plane was used to fashion the bow stem. After getting a feel for the tool, I was able to get close to my lines and reduce the thickness of a 4x4 fir CVG (clear vertical grain) to 3”. More passes with the electric plane created the roughly beveled bow stem faces that meet the side panels. A few satisfying passes with a #4 hand plane completed the job.

Bow stem shaped to the dimensions specified in the instruction manual

While seemingly trivial, organizing the building manual and accompanying construction sheets is worth the effort. It is often necessary to read a section, scratch one’s head in wonderment, and re-read until achieving clarity. It is also typical to take these instructions into the garage or work area to reference measurements and other vital details.
It begins.
The building of a 28’ Great Alaskan
In 2015, I finished building a 16’ Snow Goose garvey-style skiff designed by Sam Devlin. She is named WagoOne. The launching of that little boat and its subsequent uses with family and friends was one of my most personally rewarding experiences. Building a boat is arduous, even for experienced builders. It requires resources, time, determination, and learning. The process can teach painful lessons and gives reasons for doubt and frustration. But at some point, perhaps when the installation of the first piece of carefully made brightwork or coat of primer transforms the faired hull into something artful, the pieces of wood and glue and sweat, and blood are imbued with a soul. There is a moment when a boat takes on a presence of its own. The maiden voyage is almost surreal. It is both the culmination of one adventure and the beginning of many more — because a boat is made for seeking.
Now, in the late summer of 2022, I begin construction of a new boat, a bigger boat, one that may open yet more doors to even greater adventures. Much has transpired in the seven years since the launch of Wago One. Our children have become young adults and have experienced many trials and triumphs. The world has experienced and continues to endure a pandemic, sociopolitical upheaval, and strife. And I have grown older. Yet the yearning to build a vessel capable of taking me and any willing family members and friends further from the familiar shores is strong. I was told this would be the way by others who have built boats. The completion and the having lead to wanting. We sometimes romanticize the past.
I have chosen to build a 28’ Great Alaskan, designed by Brian Dixon. The Great Alaskan is, in many ways, a larger version of the Tolman Skiff, Jumbo — a design developed and perfected by Ren Tolman in the 1980s. Many of these boats have been built, and many have stood the tests of tide and time. Properly made, these are seaworthy craft that some captains take to fishing shoals one hundred miles offshore. The boat is designed to be seaworthy and efficient, cruising at 22 knots for peak efficiency and allowing speeds up to 45mph if desired and if adequately powered. The boat features a pilot house and bunks to provide protection from the weather and the ability to travel greater distances.
The Great Alaskan uses the “stitch and glue” building method; It is made primarily from plywood, fiberglass, and epoxy. Stitch-and-glue boats (so-called because of the means by which their plywood panels are joined with wire or ties and epoxied together) purportedly rival the strength of commercial fiberglass hulls and even many wooden boats. Stitch-and-glue skiff-style boats, like the Great Alaskan, offer a lightweight boat with moderate deadrise, allowing the boat to plane quickly and efficiently while maintaining the ability to cut through moderate seas. While these boats may not cut through chop like much heavier modern deep-V commercial fiberglass hulls, they reduce fuel consumption significantly — some say by more than half. Their relatively light weight and great strength allow them to be powered by smaller motors while enduring roughness should they need to. Despite the relatively modern approach to building this boat, it is a beast and will require substantial effort. I do not yet know how life’s demands, weather, and the unknown will affect the time required to make and launch this craft.
All of this said, work is begun.